|
andygtt
|
|
|
Group: Forum Members
Posts: 157,
Visits: 1.2K
|
Hi All Thought Id share with you the project Im doing.. its been underway for some time now and I have been liasing with easy composites for all that time. Hopefully posting on here will allow the experts here to chirp in when they see me making mistakes  Basically I have made a new design of rear clip for my Noble, I modified the clip then took a mould from it then cut the modded sections out and tried to re-make the sections in a single piece... however we had concerns due to the size of the sections that it would crack and I want it perfect so that risk is simply not acceptable. sooooooo I have decided to take a mould of the entire rear clip and remake it using the resin infusion method.... its a big project for me as I have never worked with carbon fibre or any kind of resin infusion method... I have however been assured I will be able to cope, and we will see I also have a few other parts to do including light pods (my new design) and a dash binacle. Anyhow some pics of the bucks that will be used... various states of finishes but clip and binnacle are ready for polishing... going to try to do binnacle first as its a simple design and good to start with. |
|
|
|
|
Daz
|
|
|
Group: Forum Members
Posts: 93,
Visits: 651
|
Hi There Looks a big part to do . Im also doing some body panels and have as of last night infused the roof 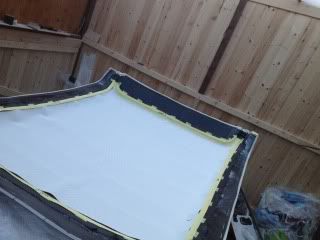 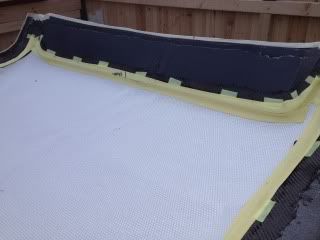 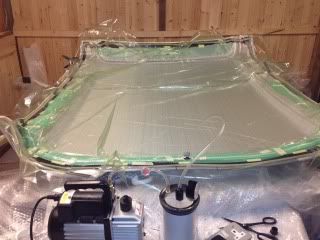 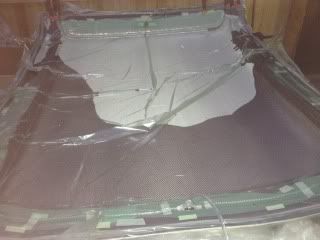 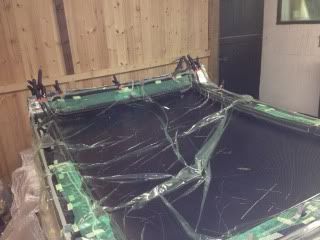 I have used soric between 2 layers of carbon, so i didnt use the flow mesh I wish i had as it took 4 1/2 hours to infuse and i did start quite late and finnished at  Also the mould has to be quite substantial as my first one didnt cut it I know its another expense but i would bag the mold up before you use it and see if it pulls a vacume and holds it Thats what i do now on the big parts as its a ball ache having to strip the layers out to see where its got a tiny pin hole as my biggest mold had :-( I also spray the gel coat on know as this seems to give a much better coverage, This is the forum to get some great tips Keep us updated, Daz,
|
|
|
|
|
Joe
|
|
|
Group: Forum Members
Posts: 310,
Visits: 1.5K
|
Nice project, Andy. Keep us updated. Daz, nice to hear from you too... but come on, stop teasing us and show some pics. We all know its cured now 
 A $1000 electronic device will always protect a 10 cents fuse A $1000 electronic device will always protect a 10 cents fuse
|
|
|
|
|
jamesw
|
|
|
Group: Forum Members
Posts: 61,
Visits: 558
|
Looks interesting! Are you creating a single mould for that entire rear clip? I'm not an expert and wondering how you would get the part out with all the wraparound?
James
|
|
|
|
|
andygtt
|
|
|
Group: Forum Members
Posts: 157,
Visits: 1.2K
|
yes it will be a single piece part... the mould will have a lot of breaks and there is no doubt its not going to be simple. did a trial of the binnacle at weekend... typically the temp dropped for the day I attempted it so I was worried about the mould curing and slapped it under a halogen lamp. It cured alright but at a temp that was so high I couldnt touch the mould... it melted all the cheapo paint that was under the filler in my buck and I think evaportated the release stuff so I had to destroy the buck to remove and even then the mould isnt as smooth as the buck was. Its still not terrible and can be used as a trial for the resin infusion process and if the part I make cant be made perfect I will just make another mould of the new part after its got back to its former glory |
|
|
|
|
andygtt
|
|
|
Group: Forum Members
Posts: 157,
Visits: 1.2K
|
Daz... Im interested in seeing a few pics of your project, maybe share a few ideas, do you have a thread going anywhere?
|
|
|
|
|
Daz
|
|
|
Group: Forum Members
Posts: 93,
Visits: 651
|
Hi , I havnt got a thread im waiting to finnish all the carbon and then do a build thread, One other tip i have is when you make the molds make the flanges where the bag tape is going bigger than you think I have remade some molds and have done this it makes bagging up SO SO much easyer It may be that im a novice and a pro would get on with smaller edges But with the carbon ,kevlar,peelply ,infusion mesh and bag i found it too tricky Its nice to be able to tape stuff down and have a nice clear edge to bag to Here is a couple of pickys dont want to clog your thread up :-) Roof just out of mold 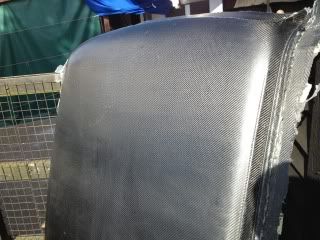 One of the arches 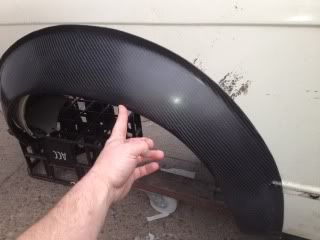 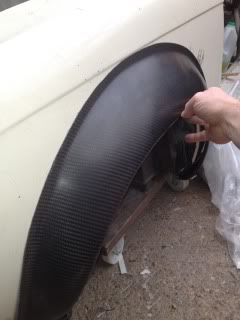 The wings are going carbon as well but im still in the process of fitting wing vents to the original ATB Daz
|
|
|
|
|
andygtt
|
|
|
Group: Forum Members
Posts: 157,
Visits: 1.2K
|
Daz (03/04/2012)
Hi ,
One other tip i have is when you make the molds make the flanges where the bag tape is going bigger than you think
I have remade some molds and have done this it makes bagging up SO SO much easyer
ATB Dazyour parts look great look forward to seeing more must say after making 1 part I already 100% agree with your advice and going to make the flanges 3 times the size on all new moulds i make one question... how long does the resin take to cure?
|
|
|
|
|
andygtt
|
|
|
Group: Forum Members
Posts: 157,
Visits: 1.2K
|
The binnacle took 3 days to cure lol... anyhow even though the bag lost pressure and the small flanges on my mould meant i couldnt get the core materials right into the edge I decided to go ahead with the pull regardless as it was going to be 5 days before I could have another go. well the part is significantly better than I expected, I learnt a lot and it is possible with more care I might be able to use the binnacle mould to get my final part.
|
|
|
|
|
andygtt
|
|
|
Group: Forum Members
Posts: 157,
Visits: 1.2K
|
started laying up the mould for rear clip... huge part, loads of release lines. started with the wheel arch gills |
|
|
|