|
Ragged99
|
|
|
Group: Forum Members
Posts: 7,
Visits: 106
|
Hi Guys, I thought I'd pop up and show you what my mate Tim and I are doing with the Easy Composites systems in our garages. We're what Enzo Ferrari called "Garagistas" in that we both own AB Performance Sabre race cars, and we build, modify, and prepare them to run in a race series called RGB with the 750 motor Club. In short we're clubman racers and we like building stuff. Our cars are powered by bike engines, and we aren't allowed wings. so we need to generate aero efficiency from the main body of the car. Tim is in mid build of his new Sabre and wanted non standard bodywork to try and improve the aero efficiency, and I wanted different bodywork on my year old Sabre as the car is currently too big to fit in my garage without partially disassembling it, which is a right pain when you arrive home at midnight after a weekends racing. Also I'm a big lad and ultra lightweight carbon bodywork will help me get down to the minimum weight limit for the car and driver. So we basically decided to build our own bodywork from scratch. I'd done some small scale fibreglass, buck and mould building in the past on a former car, and we were pretty impressed with the resin infusion process so decided to give the Easy Composites system a try. We even ran a test infusion process on my glass coffee table top ;-) to make some flat carbon panels. Although we've never tackled anything of this size, we're doing the full spectrum of build a buck, surface it, then make a mould, them carbon resin infused parts. So for the last couple of months we've been building a buck around Tim's partially complete chassis. Well in fact Tim has 90% of the work and I'm chipping in at weekends. The buck has been built from timber, 3mm mdf board which is nicely flexible for simple curves, filler and foam. and we're now at the pattern coat primer stage. We've learned a lot along the way, but basically we've followed the video tutorials and have just scaled up the processes. Full details are on Tim's website at www.hoverd.orgDetails of my racing are at www.rgbracer.com.. and the main AB performance website is www.abperformance.co.uk. But to whet your appetite here's a picture of the buck in pattern coat. 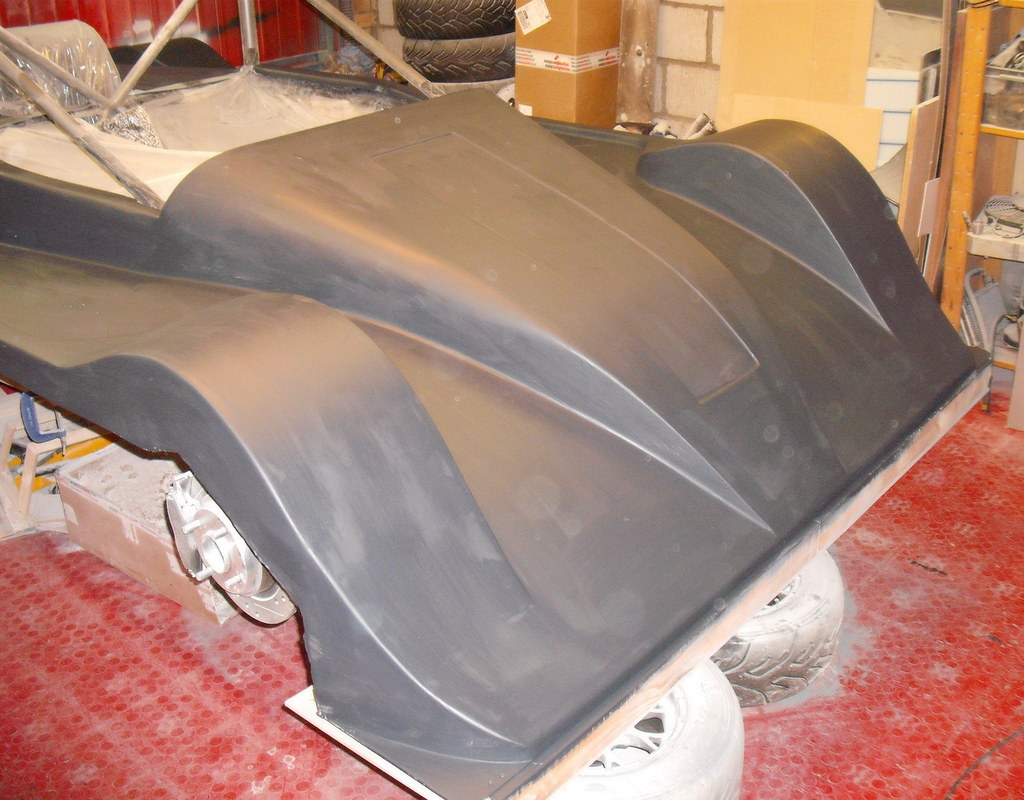 Cost to date in materials for the buck, pattern coat, foam etc is about 500 quid, although I've just spent about 600-800 on Unimould materials + CSM for the mould making stage.
|
|
|
|
|
wildcard
|
|
|
Group: Forum Members
Posts: 40,
Visits: 406
|
Oh I'm excited about this project. I will definitely be checking on the progress.
|
|
|
|
|
Warren (Staff)
|
|
|
Group: Administrators
Posts: 2.5K,
Visits: 8.5K
|
Looks like a fun project!
One thing i will say is plan your mould flanges and mould split lines very carefully to ensure no mechanical lock and also easy demoulding and mould assembly. You have to make your moulds such that you can assemble it and it holds the shape accurately. You can use wooden battens on the reverse to further stiffen the moulds up.
Warren Penalver
Easy Composites / Carbon Mods - Technical Support Assistant
|
|
|
|
|
Matt (Staff)
|
|
|
Group: Forum Members
Posts: 680,
Visits: 1.9K
|
Hi Adrian, It's great to see another ambitious project that looks like it might be well documented on the forum. We're very pleased to be working with you and I look forward very much to seeing how it all unfolds. Pattern is looking good at this stage; Pattern-Coat Primer and Pattern Coat Hi-Gloss are excellent products for preparation of an MDF pattern like this. The curves look really nice and smooth; I wonder whether you used a product called 'bendy board' which is a sort of this grooved MDF which can be very useful for this type of work. Keep up the good work  Matt
Matt StathamEasy Composites / Carbon Mods - Technical Sales
|
|
|
|
|
FLD
|
|
|
Group: Forum Members
Posts: 468,
Visits: 2.7K
|
OUTSTANDING!
I'll look forward to seeing this one take shape.
|
|
|
|
|
Teem
|
|
|
Group: Forum Members
Posts: 6,
Visits: 19
|
Matt (Staff) (03/01/2014)
Pattern is looking good at this stage; Pattern-Coat Primer and Pattern Coat Hi-Gloss are excellent products for preparation of an MDF pattern like this. The curves look really nice and smooth; I wonder whether you used a product called 'bendy board' which is a sort of this grooved MDF which can be very useful for this type of work. Keep up the good work Matt Well, most of the work is actually mine!
We didn't use bendy board, it's just 3mm MDF which bends perfectly nicely! We were concerned that where we'd had to rub down the MDF and had knocked off the surface layer the material had gone fluffy. However, covering that in pattern coat primer and rubbing down seems to solve the problem completely.
|
|
|
|
|
Teem
|
|
|
Group: Forum Members
Posts: 6,
Visits: 19
|
Warren (Staff) (03/01/2014)
One thing i will say is plan your mould flanges and mould split lines very carefully to ensure no mechanical lock and also easy demoulding and mould assembly. You have to make your moulds such that you can assemble it and it holds the shape accurately. You can use wooden battens on the reverse to further stiffen the moulds up.Warren, Thanks. It has to be said that we've probably spent more time talking about split lines and how to made flanges on the mouldings that locate them against each other than just about anything else. We now think we've got the basic ideas sorted out. However, time will tell! One issue, to be honest, is that we've built the buck on the car chassis itself (it doesn't actually run yet but all the running gear/wiring/cooling/etc is there). You can see the chassis/suspension/engine in the photos on my website. As such, it's going to make fitting fences to the mould a bit tricky; there's a particular issue around the roll-hoop support diagonals that we haven't entirely resolved yet. (Well, I have but I've failed to convince Adrian as yet!  ) )
|
|
|
|
|
Munkee
|
|
|
Group: Forum Members
Posts: 5,
Visits: 200
|
I'll be watching with interest - I really like the Sabre and one day might have the time, money and space to build one myself (technically I have the space now, but it's filled with Westfield and the wife would be most upset if I replaced it with something as focused as a Sabre).
Looking good though!
|
|
|
|
|
Warren (Staff)
|
|
|
Group: Administrators
Posts: 2.5K,
Visits: 8.5K
|
Hi Tim,
To solve your flange issue, in an ideal world I'd say lift the plug off the body (if stiffenough) so you have unrestricted access all round. However, this may not be as practical or easy as it sounds in some cases!!!
However, if you can't do that, its not the end of the world. You just have to go back to think of the purpose of the flange where you have located it. For most processes a small flange of sorts is necessary to give a neat edge to the part so you can trim it and also it helps prevent mechanical lock. For vacuum processes, it is a little more important as the flange is often also used as the bagging flange and you would need the space to fit the bagging stack so it seals well to the mould flange. Extra space is particularly important on the vacuum port areas and the resin feed side of the mould.
So not withstanding that, you can be quite creative with fluted signboard when making flanges so you just have to do it the best you can where things are tight.
Warren Penalver
Easy Composites / Carbon Mods - Technical Support Assistant
|
|
|
|
|
Teem
|
|
|
Group: Forum Members
Posts: 6,
Visits: 19
|
Warren, Thanks. However, the plug relies rather completely on the chassis for support and, as such, it'd be hard to separate! However, Adrian and I had a chat through at the weekend and I think we're clearer now on where the flanges should be. We doubtless have some questions about them, though, which can wait a while. What we did do was to make the plug green by adding some pigment into the final coat of pattern primer. Hopefully there's just another rub-down requires which I reckon is about 30 hours work. Gulp...  Tim
|
|
|
|