learn composites in three easy steps, Race GSXR 400 build (slow)


Author
Message
Hanaldo
Hanaldo
Supreme Being (14K reputation)Supreme Being (14K reputation)Supreme Being (14K reputation)Supreme Being (14K reputation)Supreme Being (14K reputation)Supreme Being (14K reputation)Supreme Being (14K reputation)Supreme Being (14K reputation)Supreme Being (14K reputation)
Group: Forum Members
Posts: 2.5K, Visits: 28K
For tricky little strip's of fabric like that, I suggest getting some spray adhesive from EC and spray your carbon fabric with it before cutting. Let it dry, then after about 15 minutes it shouldn't be sticky at all any more. This fabric will then behave like a set-weave fabric like EC's Profinish, and you can cut it very accurately and intricately without it fraying too badly. Not as good as pre-preg, but much easier than loose fabric. 

Then when you place it in the mould, place the side that you sprayed with adhesive facing you, so the 'dry' side is on the mould surface. You won't get any cosmetic defects from the adhesive this way.
VVS
VVS
VVS
posted 9 Years Ago HOT
Supreme Being (1.2K reputation)Supreme Being (1.2K reputation)Supreme Being (1.2K reputation)Supreme Being (1.2K reputation)Supreme Being (1.2K reputation)Supreme Being (1.2K reputation)Supreme Being (1.2K reputation)Supreme Being (1.2K reputation)Supreme Being (1.2K reputation)
Group: Moderators
Posts: 226, Visits: 334
Had to leave the bike sad and lonely for a couple of weeks due to going to Oulton Park and Anglesey for some track time,
since getting back I've kicked back in with the moulds and made a couple more.

I made the rear hugger, sorry forgot to take photos so will post the infusion.

I got the nose cone back out that I'd 3/4 prepared, fitted the up stand to make it a two part mould and got the resin out.

Ready for tooling gel coat.


First layer of tooling gel coat ready.
 

Glassed up and ready for the other side to be applied,
i gave the split a clean with mould cleaner then applied 6 or 7 coats of easy lease.


Second side with first layer of tooling gel coat appided.


All finished.Smile


If anyone wants some advice its don't get greedy and only mix a couple of hundred grams of resin at a time,
first pot i mixed was 500 grams and after about 200/250 grams was applied it cooked up in the pot.
I you are working large flat areas its ok but on smallish complicated shapes you will regret it.

Ive not had time to split it down due to work so will post the finished mould plus the infusion when time allows.

I also made the V piece for my belly pan and this has to be a prime example of how good this stuff is,
i wouldn't advise you do this but i made the plug in around 10 minutes and finished the job in 15.

There was around 100grams of tooling gel coat left over so not wanting to waste it i cut some sign board
to fit the belly pan, fillet waxed it and coated it in a couple of heavy layers of easy lease while the gel coat 
was cooking in the pot, as i applied it i could tell i needed to work fast  W00t

banged a layer of glass putty on and a couple of layers of glass over that.
I find its loads better with a layer of glass on the back, i made some frame guards for the road bike
using the putty and one broke in half without the extra strength the glass gives.
anyhow it turned out very well and will work a treat.
Its a small part that you can hardly see so i didn't want to put a lot of time in.

V piece mould.
 

There are three small voids that are all off part, i will touch these up before lay up,
i will only wet lay and low vacuum bag this part.

I also made the side panel return mould.
This is a tiny 1" thin edge that should be part of the side panel,
when i made the three part uni system mould (still to lay up) i kept it simple by leaving
this piece out,
you cannot see it and the mould would have been way too complex for my limited expertise,
Its a good job as its near impossible to keep the weave straight due to the size of part.
 
Sign board edge to panel, ready to gel.


Finished ready to break down.


3 layers of 200grm cf, peel ply, perforated film, cloth plus a light vac.
 

Finished trimmed part placed in the side panel mould as would fit to panel,
like i said slight weave damage but it at 1" wide its a night mare to cut and unseen.


I will get the nose cone finished this week and hopefully make the finished part at the weekend,
also im off work for a week on the 29th so will go for the biggie, the seat.

Chris. 
 
Edited 9 Years Ago by VVS
Matthieu Libeert
Matthieu Libeert
Supreme Being (4.8K reputation)Supreme Being (4.8K reputation)Supreme Being (4.8K reputation)Supreme Being (4.8K reputation)Supreme Being (4.8K reputation)Supreme Being (4.8K reputation)Supreme Being (4.8K reputation)Supreme Being (4.8K reputation)Supreme Being (4.8K reputation)
Group: Forum Members
Posts: 955, Visits: 3.4K
looking good! thanks for sharing Smile keep up the good work Wink

Matthieu Libeert
Founder MAT2 Composites X Sports
website:
www.mat2composites.com


VVS
VVS
VVS
posted 9 Years Ago HOT
Supreme Being (1.2K reputation)Supreme Being (1.2K reputation)Supreme Being (1.2K reputation)Supreme Being (1.2K reputation)Supreme Being (1.2K reputation)Supreme Being (1.2K reputation)Supreme Being (1.2K reputation)Supreme Being (1.2K reputation)Supreme Being (1.2K reputation)
Group: Moderators
Posts: 226, Visits: 334
I will have a play about with a couple of small parts to get a feel so im better equipped for the larger panels.

Will give the mudguard a go next week. 
Warren (Staff)
Warren (Staff)
Supreme Being (15K reputation)Supreme Being (15K reputation)Supreme Being (15K reputation)Supreme Being (15K reputation)Supreme Being (15K reputation)Supreme Being (15K reputation)Supreme Being (15K reputation)Supreme Being (15K reputation)Supreme Being (15K reputation)
Group: Administrators
Posts: 2.5K, Visits: 8K
Yes you can throttle the resin feed quite easily with a line clamp.

Also for cosmetic parts you can leave the resin feed open a little longer than you normally would to make the part slightly resin rich thus hopefully meaning you will have no pinholes.

Warren Penalver
Easy Composites / Carbon Mods - Technical Support Assistant
VVS
VVS
Supreme Being (1.2K reputation)Supreme Being (1.2K reputation)Supreme Being (1.2K reputation)Supreme Being (1.2K reputation)Supreme Being (1.2K reputation)Supreme Being (1.2K reputation)Supreme Being (1.2K reputation)Supreme Being (1.2K reputation)Supreme Being (1.2K reputation)
Group: Moderators
Posts: 226, Visits: 334
Yes having read the principle of resin being pushed in under atmospheric pressure i should know this but basic in experience is the kill.
When that stuff is flowing through like beer down an alcies neck its very easy to switch forget basic stuff.lol

I don't mind problems, in fact im open to them as its the quickest way to learn.  
So I can simply control the resin ratio via the inlet clamps, leave them open to get a heavier resin to cloth mix?

Next cosmetic part I do i think I'll will leave it a few seconds later and see, you got a good time?
Hanaldo
Hanaldo
Supreme Being (14K reputation)Supreme Being (14K reputation)Supreme Being (14K reputation)Supreme Being (14K reputation)Supreme Being (14K reputation)Supreme Being (14K reputation)Supreme Being (14K reputation)Supreme Being (14K reputation)Supreme Being (14K reputation)
Group: Forum Members
Posts: 2.5K, Visits: 28K
Turning the pump off wouldn't have worked either, as it isn't the pump that does the infusing, it's the pressure differential between the atmosphere inside/outside the bag. I've actually fully infused a Lotus roof where I forgot to unclamp the vacuum line before I let the resin go. Only noticed when the thing was totally finished. 
davro
davro
Supreme Being (1.5K reputation)Supreme Being (1.5K reputation)Supreme Being (1.5K reputation)Supreme Being (1.5K reputation)Supreme Being (1.5K reputation)Supreme Being (1.5K reputation)Supreme Being (1.5K reputation)Supreme Being (1.5K reputation)Supreme Being (1.5K reputation)
Group: Forum Members
Posts: 300, Visits: 2.2K
Hi Chris,

Infusion are looking nice! getting a bit keen with the double infusion Wink

When I clear coat a product I use a 2K clear coat only mix within manufactures mixing recommendations.
Spray, sand, Spray sand ...
I normally do 6 clear coats thin/medium layers, I really hate sanding runs out of clear coat it messes with me eyes Hehe

Looking forward to seeing your bike all carbonised!

Put me down for a box of your through bag insertsSmile


David Stevens
YouTubeComment | Rate | Subscribe
Instagram

Composite Projects
Body Package for Dax Rush
RC Car Touring Body 1/10 Scale


Edited 9 Years Ago by davro
VVS
VVS
VVS
posted 9 Years Ago HOT
Supreme Being (1.2K reputation)Supreme Being (1.2K reputation)Supreme Being (1.2K reputation)Supreme Being (1.2K reputation)Supreme Being (1.2K reputation)Supreme Being (1.2K reputation)Supreme Being (1.2K reputation)Supreme Being (1.2K reputation)Supreme Being (1.2K reputation)
Group: Moderators
Posts: 226, Visits: 334
THE DOUBLE INFUSION.

What can I say, I will not be doing another in a hurry!

The idea was simple, apply vac to moulds, open TWO vac side clamps, then open TWO inlet clamps and infuse, right.

Part infusion.


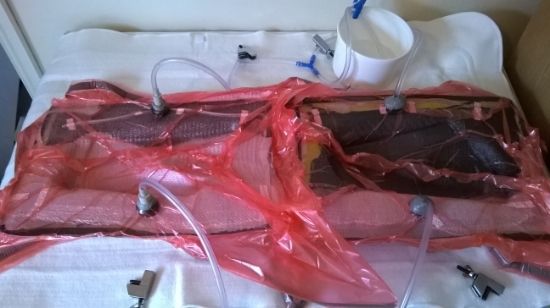
It was going very slowly almost not moving on the left, this was due to me re clamping the left side because of vac leaks.

As you can see from the picture I'd removed the clamps, BAD IDEA, to try and speed up the left side I wiggled the pipes and WHOOSH

more suck than a prozzie on crack, by the time I picked one of the clamps up the supply pot was gasping for resin and sucking air.

Wow it empties faster than it fills.

Please excuse the size change in pictures but photobucket seem to have a mind of its own.

With everything re clamped I made some more resin up and gave it some more, I now know what a catch pot if for!


Second time round.


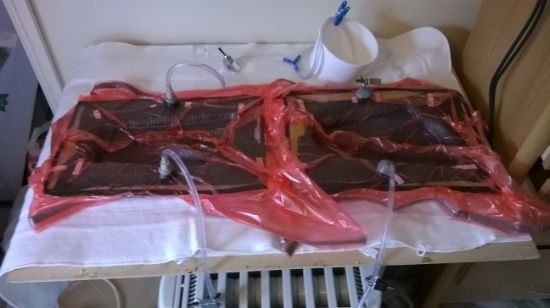
I'm sure I could have simply switched the pump off but inexperience is a killer.


Untrimmed finished panel.


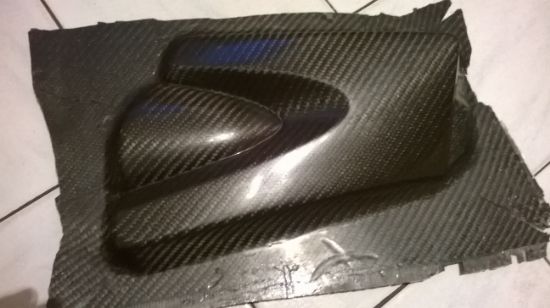
Surprisingly they turned out 97%, there are some very small pinholes

but being a side panel on the road bike will need clear coating.

So question to you all in the know is do I put a wet, thin clear coat on as it will be sucked up as you would new plaster,
or whack on a couple of heavy coats.


@ Dravis the through bag inserts I turned seem to be one hit wonders, might be my rough drilling but resin is solid.

Only cost about £2.40 a mtr so I will simply make some more as id rather 15min on the lathe than a day chasing a leak. 
Edited 9 Years Ago by VVS
VVS
VVS
VVS
posted 9 Years Ago HOT
Supreme Being (1.2K reputation)Supreme Being (1.2K reputation)Supreme Being (1.2K reputation)Supreme Being (1.2K reputation)Supreme Being (1.2K reputation)Supreme Being (1.2K reputation)Supreme Being (1.2K reputation)Supreme Being (1.2K reputation)Supreme Being (1.2K reputation)
Group: Moderators
Posts: 226, Visits: 334
Haha, patent pending!
GO

Merge Selected

Merge into selected topic...


Merge into merge target...


Merge into a specific topic ID...


Similar Topics

Reading This Topic

Explore
Messages
Mentions
Search