|
Matthieu Libeert
|
|
|
Group: Forum Members
Posts: 955,
Visits: 3.4K
|
dr3bin (11/04/2013)
Good video. So that guy goes with one thick layer rather than the 'multiple thin layers' process. Something else to try - although I know if I go with a thick layer I'll get 'pools' of resin in the recesses where the bolts go, so that'll make things interesting when I come to drill through the carbon once cured fully Looks like he left the basecoat to dry fully instead of going to a tack as the plastic sheet didn't 'stick' to it when he placed it upside down on the bench I would indeed do this in a different way and let it go to a tacky state, to improve the bond with the resin going on top and that black basecoat, I would of liked to have seen how he trims the excess off the back of the part, as I don't imagine he left it all stuck to the back with the double-sided tape The triming shouldn't be that difficult? trim of the excess with a dremel or sand the edge till you are through the carbonfiber...
All good to see though. I'll have to try multiple processes to see which works best, or mash a few up to best suit me In addition to this I can show you a video I've made on how I did some "skinning" on a helmet I've made, I Had some dry spots so I've added some layers of resin on top of it (like the skinning process) |
|
|
|
|
dr3bin
|
|
|
Group: Awaiting Activation
Posts: 4,
Visits: 9
|
Good video. So that guy goes with one thick layer rather than the 'multiple thin layers' process. Something else to try - although I know if I go with a thick layer I'll get 'pools' of resin in the recesses where the bolts go, so that'll make things interesting when I come to drill through the carbon once cured fully Looks like he left the basecoat to dry fully instead of going to a tack as the plastic sheet didn't 'stick' to it when he placed it upside down on the bench I would of liked to have seen how he trims the excess off the back of the part, as I don't imagine he left it all stuck to the back with the double-sided tape All good to see though. I'll have to try multiple processes to see which works best, or mash a few up to best suit me
|
|
|
|
|
Matthieu Libeert
|
|
|
Group: Forum Members
Posts: 955,
Visits: 3.4K
|
Came across this video yesterday, and thought of this topic, this is how it should be done in my opinion.
|
|
|
|
|
dr3bin
|
|
|
Group: Awaiting Activation
Posts: 4,
Visits: 9
|
Yeah I leave the black layer long enough to tack before attempting to place the fabric. My main gripe is when trimming the excess, the parts I cut off fray and go everywhere. Next time I'll put some duct tape around the edges to hold it together. I imagine this will stop the fabric from fraying Thanks, I'll take a look at that. I was going to buy a perma-grit sanding block when skinning my first item but for some reason I didn't get it. I'll be sure to invest in one now Due to the part being on top of the engine, it'll be exposed to very high temperatures - so I got the high temp epoxy resin. However, after testing the part in my car for a week the part didn't really get that hot - 'quite warm' best describes it but in no way 'hot'. Maybe the standard coating resin will do the job if it's easier/better to work with when skinning parts?
|
|
|
|
|
fgayford
|
|
|
Group: Forum Members
Posts: 433,
Visits: 1.2K
|
dr3bin (10/04/2013)
Thanks for your reply Fred I've got a new cover on the way so I'll give your strategy a go and will let you know how things turn out  I have a massive roll of 2/2 twill left over which I'm using as practice. I've quickly found that this stuff is difficult to use as it frays so much and it gets everywhere. When I'm done with this roll I'll be getting some of Easy Composites' "ProFinish" carbon fabric as there will be significantly less frayed material and I'm hoping it'll be easier to work with When skinning the tack of the black coat should grab the twill before it unravels?Where did you get your carbon burr from? I have a few other parts I'd like to skin which have holes for bolts on, so something like that would come in handy as 'normal' drill bits don't do the job It is listed on the Easy composites webstore. The first burr is in the rotory Perma Grit kit. By the way I got one of the Perma-Grit sanding boards and highly recommend it. It is a tool that I cannot do without. I've read on other sites that putting the part in the oven helps remove bubbles. I guess that's the same as blasting it with a heat gun / hairdryer though You don't need the oven, if you are at room temp with everything a heat gun is all that is needed.You are using skinning resin? Other resin is too thin and a waste of time.
Also - there's a YouTube video of some dude spraying acetone onto his part which removes the bubbles! So that's something I'd like to try out too. Maybe a combination of acetone and heat will remove the vast majority (if not all visible) bubbles? Shaneer22, I'd love to get an infusion kit however as a hobbyist and newcomer to carbon fibre I lack both the space and funds to invest in one. I know I can get great results from skinning, (maybe not flawless parts, but still great quality) it's just practice and learning from others which will get me there
|
|
|
|
|
Matthieu Libeert
|
|
|
Group: Forum Members
Posts: 955,
Visits: 3.4K
|
An oven should work as well, but never tested it before... What heat does is remove the surface tension of the epoxy and makes the resin les viscous, meaning more runny... due to those facts you should have less air... Tested acetone once before without overwhelming results... will test it once again in the summer with acetone out of a spraygun. The problem I had was a presure build up from the acetone in a closed pot (evaporating)
|
|
|
|
|
dr3bin
|
|
|
Group: Awaiting Activation
Posts: 4,
Visits: 9
|
Thanks for your reply Fred I've got a new cover on the way so I'll give your strategy a go and will let you know how things turn out I have a massive roll of 2/2 twill left over which I'm using as practice. I've quickly found that this stuff is difficult to use as it frays so much and it gets everywhere. When I'm done with this roll I'll be getting some of Easy Composites' "ProFinish" carbon fabric as there will be significantly less frayed material and I'm hoping it'll be easier to work with Where did you get your carbon burr from? I have a few other parts I'd like to skin which have holes for bolts on, so something like that would come in handy as 'normal' drill bits don't do the job I've read on other sites that putting the part in the oven helps remove bubbles. I guess that's the same as blasting it with a heat gun / hairdryer though Also - there's a YouTube video of some dude spraying acetone onto his part which removes the bubbles! So that's something I'd like to try out too. Maybe a combination of acetone and heat will remove the vast majority (if not all visible) bubbles? Shaneer22, I'd love to get an infusion kit however as a hobbyist and newcomer to carbon fibre I lack both the space and funds to invest in one. I know I can get great results from skinning, (maybe not flawless parts, but still great quality) it's just practice and learning from others which will get me there
|
|
|
|
|
Shaneer22
|
|
|
Group: Forum Members
Posts: 156,
Visits: 14K
|
You have to degass your resin,the problem with wet lay up is even after degassing is brushing or stippling introduces air,that why infusion is better.
|
|
|
|
|
fgayford
|
|
|
Group: Forum Members
Posts: 433,
Visits: 1.2K
|
Your closer to success than you think.
Firsts of all I have delt with all the problems you have named so far. So I have done the pain and now make perfect parts this way.
So here is my opinion which others may disagree with?
When you follow the skinning process and you are at the brushing the resin on part, make sure to go about 3 coats and let that cure overnight at a good warm temperature. MAKE SURE you get the second coat on while the first coat is still tacky but doesn't come off on your finger. If it is somewhat dry to the touch your too late and the second coat will be a mess. (I did it already) same with the third coat. (also, pop the bubbles with a hairdryer or heat gun after each coat. your resin should be warmed before you coat your part also)
Now wet sand flat but don't go into the fiber. Wipe down with 99% pure alcohol and apply another 3 coats as above.
Once cured wetsand down to get the part flat. Forget about polish at this stage, you really must spray your part with 2K automotive clear coat to get the magic to happen. Once you have put on 3 coats of clear wet sand flat and apply 3 more clear again, but before you wet sand let the part cure completely in a warm place for a few days.
Now wet sand to (I go all the way up to 2500) and then polish.(I use 3m 3 stage polish) Now you have a carshow shine!!
So lets say you have a bubble? I use a jewelers googles and with a large pin puncture the bubbles, some times I use a tiny drill bit turning it in my fingers and get to the bottom of the hole. I then mix up some clear coat and dab the pin into it and then put the pin in the hole letting the clear run down filling the hole. Let it go proud of the hole. Once cured use really fine wet paper and flat sand it level. Once all your holes are filled and flattened wipe down with alcohol and spray clear on again, sand , polish and your done. This sounds like a lot of work but the end result is worth it.
Don't drill your hole with a drill bit. I have a carbon burr on my dremel (its about 1/8 inch dia) I can open the hole with total control and a perfect edge.
Hope this helps.
Fred
|
|
|
|
|
dr3bin
|
|
|
Group: Awaiting Activation
Posts: 4,
Visits: 9
|
Hey everyone, I'm new to carbon fibre. Took an interest after looking through Carbon Mods and watching their videos, so I thought I'd give skinning a go as I have a few parts I'd like to carbon-fibre up I have (what I class as) a 'fairly simple' shape. A spark plug cover for my car. First time I've ever skinned anything, so I knew it'd mess it up. Which I did. A load of times. However the finished product finally came out and it looks like this; 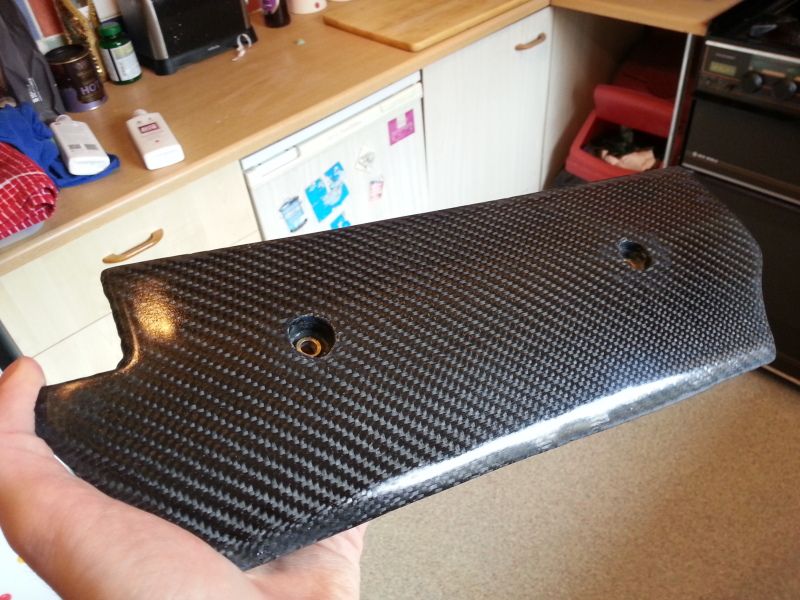 The major issues I have is the finish is rubbish. I didn't go up the grades of sandpaper long enough and you can see fine lines. There's little white dots in the resin which I believe are air bubbles. Hammering it with a low-temp heat gun didn't get rid of all the air, so it appears. Also the resin became contaminated as I re-used a brush (washed and soaked in acetone) with fresh resin for the final layer, but the resin dried as a complete fog instead of nice and clear. So about 8 hours of sanding pursued to get it to a semi-finished state, as above. You can kind of see the fogged resin along the bottom of the part. I've learnt from that to use a new brush for each layer. However, my main gripe is how on earth do I prep the carbon fibre cloth to accommodate the bolt holes. On the above example, I skinned the part, done all the resin layers before drilling the holes through - starting with a small drill bit and working my way up. But, this messed it up as the part eventually chipped around the edges resulting in a poor finish, rather than leaving it with a nice edge to work on with a file to get a nice, flat edge. Took me about 30 minutes of drilling as I knew to take it slowly and carefully. I tried cutting the fabric prior to laying the resin, however this frayed the cloth and put it all out of alignment with itself. I can't re-use the part as the fabric is bonded to the part so I binned it I'm getting pretty annoyed with this process as I want to get this part perfect so I can sell it to my car club. I know I can do it, I'm just missing knowledge that a training course or other, experienced people would be able to offer. Thus me joining up on here Any advice would be greatly appreciated
|
|
|
|