|
Damien
|
|
|
Group: Forum Members
Posts: 32,
Visits: 132
|
Dear all,
Ok, making progress ! I am going to do some pre-preg in the near future, but not quite tomorrow, because the build up of my oven is delayed due to the lockdown...
Now question about the finish...I am pretty OK with making molds of relatively complicated parts. I use hand layup then vacuum bagging, and all this works pretty smoothly. THe parts I build are quite OK, but the finish is not so very good. I always have some small bubbles or so that force me to brush another layer of epoxy at the top, then sand, then brush epoxy again...this is what takes most of my time when making parts, and it is pretty frustrating. I know that one can reach perfect finish right out of the mold, but I cannot work in the conditions to do so. I am just doing stuffs for myself, in my garage...so nothing really optimal and I think I have to live with not prefect out-of-the-mold finish. Now when I apply some epoxy coat on the parts, it is also incredibly frustrating, because with the brush, even at good temperature, it's never really flat. And also it is thicker at the edges, making the subsequent sanding a real pain. Any advice ? I was considering using an airbrush to spray very thin layers of car varnish (I am only doing small parts, so the airbrush is good enough). Or is it a bad idea ? I see people using an epoxy gelcoat in the mould for make the very good surface...but I tried something like that and with the release agent, I don't manage to get that gelcoat smooth on the surface, it makes massive fish eyes all over the place... Anyway, if someone has a relatively simple solution for me to make part finish easier, that would be soooooo helpful, because I am getting really fed up of spending so much time sanding/brushing/sanding etc...all this to get something that is not perfect either.
Finally, a need to make parts that are smooth on both sides. So I was thinking of using a mould / counter-mould approach. But how does one make sure that there is no big air bubble trapped between the carbon and the counter-mould ?
Thank you !
|
|
|
|
|
zeda3000
|
|
|
Group: Forum Members
Posts: 5,
Visits: 21
|
Small Bubbels or pin holes could be from couple of diffrent reasons.
1- Bad mixture
2- High or low room temperature
3- Too much resin flow in surface
4- Wrong resin
5- Low pressure
If you could share the picture your pin holes or bubbles and also list of your composite materials. I think i can give more detailed information.
|
|
|
|
|
Damien
|
|
|
Group: Forum Members
Posts: 32,
Visits: 132
|
Hi Zeda3000, Sorry for the late reply. I don't have a picture of the pinholes at the moment. So until now, here was my process: - Mould: I was using a black gelcoat that I bought in a composite shop for kayak builders here, backing it with glass woven and polyester resin. - Release agent: I was using either wax, or EasyLease from EC. Except recently, but that has been solved, I did not have any issue with releasing my parts. But then the issues start. Initially I was using for my carbon fiber parts a 200 gr/m2 carbon fiber cloth very similar to this: https://www.easycomposites.co.uk/honeycomb-bonding-epoxy-adhesiveMy epoxy was also epoxy sold by this kayak builder shop. It is relatively thick. I am mixing it quite well. The temperature of the room is fluctuating as I am doing this in my garage, but I tried to heat the working area as well as possible with some hot radiator. Then I apply my layers of carbon +epoxy (in a 1:1 or 1:1.2 carbon/resin ratio). Then I was using peel ply, perforated film and a breather layer (which is a bit thicker but less dense than the EC one). And then in a vacuum bag with uncontrolled vacuum (small pump with which I cannot control the vacuum. Basically, the film is really against the part and it is not easy to manually pull it away while the pump is running). I would leave the pump ON throughout the curing process. The result initially looked like I had resin starvation. Theses are lots of gaps between the carbon fibers. I was advised to limit resin flow by adding a second layer of perforated film, which helped. But nevertheless, at the end, I had still lots of small gaps...so the only method I found was to use a brush and put an extra layer of the same epoxy resin, sand (because I would still have hole and the brush does not give a nice flat surface in my hand), do it again, sand, do it again. etc...etc... this was the mots time consuming part of all. Then I was suggested to put a layer of transparent gelcoat in the mould which would be nice and uniform, let it mostly cure, and then do my carbon epoxy layup. But this never worked because that gelcoat would make massive fish eyes all over the place (whether with wax or easy lease). So I gave up on this, although I was hoping it would be the solution. Thing is that I have indeed been using chemicals (epoxy, mould gelcoat, transparent finish gelcoat, release agent etc...) for all kind of source and in particular that kayak builder shop. But it may not be the ideal stuffs for carbon parts like what I am trying to do. So now (but I have not tried yet), I have EG60 and EMP60 systems for my mould, Easy Lease for the release agent, and the EL2 laminating resin. So will see if this helps...Also I got EC breather layer. Any idea ? In the meantime, I am building myself an oven for out-of-autoclave prepreg, because I think (possibly wrongly !) that it would make my life easier and better finish right of the mould (using of course temperature resitant mould materials, resins etc...). Thanks !
|
|
|
|
|
zeda3000
|
|
|
Group: Forum Members
Posts: 5,
Visits: 21
|
+xHi Zeda3000, Sorry for the late reply. I don't have a picture of the pinholes at the moment. So until now, here was my process: - Mould: I was using a black gelcoat that I bought in a composite shop for kayak builders here, backing it with glass woven and polyester resin. - Release agent: I was using either wax, or EasyLease from EC. Except recently, but that has been solved, I did not have any issue with releasing my parts. But then the issues start. Initially I was using for my carbon fiber parts a 200 gr/m2 carbon fiber cloth very similar to this: https://www.easycomposites.co.uk/honeycomb-bonding-epoxy-adhesiveMy epoxy was also epoxy sold by this kayak builder shop. It is relatively thick. I am mixing it quite well. The temperature of the room is fluctuating as I am doing this in my garage, but I tried to heat the working area as well as possible with some hot radiator. Then I apply my layers of carbon +epoxy (in a 1:1 or 1:1.2 carbon/resin ratio). Then I was using peel ply, perforated film and a breather layer (which is a bit thicker but less dense than the EC one). And then in a vacuum bag with uncontrolled vacuum (small pump with which I cannot control the vacuum. Basically, the film is really against the part and it is not easy to manually pull it away while the pump is running). I would leave the pump ON throughout the curing process. The result initially looked like I had resin starvation. Theses are lots of gaps between the carbon fibers. I was advised to limit resin flow by adding a second layer of perforated film, which helped. But nevertheless, at the end, I had still lots of small gaps...so the only method I found was to use a brush and put an extra layer of the same epoxy resin, sand (because I would still have hole and the brush does not give a nice flat surface in my hand), do it again, sand, do it again. etc...etc... this was the mots time consuming part of all. Then I was suggested to put a layer of transparent gelcoat in the mould which would be nice and uniform, let it mostly cure, and then do my carbon epoxy layup. But this never worked because that gelcoat would make massive fish eyes all over the place (whether with wax or easy lease). So I gave up on this, although I was hoping it would be the solution. Thing is that I have indeed been using chemicals (epoxy, mould gelcoat, transparent finish gelcoat, release agent etc...) for all kind of source and in particular that kayak builder shop. But it may not be the ideal stuffs for carbon parts like what I am trying to do. So now (but I have not tried yet), I have EG60 and EMP60 systems for my mould, Easy Lease for the release agent, and the EL2 laminating resin. So will see if this helps...Also I got EC breather layer. Any idea ? In the meantime, I am building myself an oven for out-of-autoclave prepreg, because I think (possibly wrongly !) that it would make my life easier and better finish right of the mould (using of course temperature resitant mould materials, resins etc...). Thanks ! This is a lot of details hard to tell or comment without see by picture. But main suggests Change your resin. Use resin suitable for infusion or hand lay up. Prefer good brand names Change your vacuum pump. Buy somehting you can control the pressure. Please consider. More pressure is meaning better surface. Sound like to me you have poor resin flow and poor pressure.
|
|
|
|
|
Damien
|
|
|
Group: Forum Members
Posts: 32,
Visits: 132
|
+x+xHi Zeda3000, Sorry for the late reply. I don't have a picture of the pinholes at the moment. So until now, here was my process: - Mould: I was using a black gelcoat that I bought in a composite shop for kayak builders here, backing it with glass woven and polyester resin. - Release agent: I was using either wax, or EasyLease from EC. Except recently, but that has been solved, I did not have any issue with releasing my parts. But then the issues start. Initially I was using for my carbon fiber parts a 200 gr/m2 carbon fiber cloth very similar to this: https://www.easycomposites.co.uk/honeycomb-bonding-epoxy-adhesiveMy epoxy was also epoxy sold by this kayak builder shop. It is relatively thick. I am mixing it quite well. The temperature of the room is fluctuating as I am doing this in my garage, but I tried to heat the working area as well as possible with some hot radiator. Then I apply my layers of carbon +epoxy (in a 1:1 or 1:1.2 carbon/resin ratio). Then I was using peel ply, perforated film and a breather layer (which is a bit thicker but less dense than the EC one). And then in a vacuum bag with uncontrolled vacuum (small pump with which I cannot control the vacuum. Basically, the film is really against the part and it is not easy to manually pull it away while the pump is running). I would leave the pump ON throughout the curing process. The result initially looked like I had resin starvation. Theses are lots of gaps between the carbon fibers. I was advised to limit resin flow by adding a second layer of perforated film, which helped. But nevertheless, at the end, I had still lots of small gaps...so the only method I found was to use a brush and put an extra layer of the same epoxy resin, sand (because I would still have hole and the brush does not give a nice flat surface in my hand), do it again, sand, do it again. etc...etc... this was the mots time consuming part of all. Then I was suggested to put a layer of transparent gelcoat in the mould which would be nice and uniform, let it mostly cure, and then do my carbon epoxy layup. But this never worked because that gelcoat would make massive fish eyes all over the place (whether with wax or easy lease). So I gave up on this, although I was hoping it would be the solution. Thing is that I have indeed been using chemicals (epoxy, mould gelcoat, transparent finish gelcoat, release agent etc...) for all kind of source and in particular that kayak builder shop. But it may not be the ideal stuffs for carbon parts like what I am trying to do. So now (but I have not tried yet), I have EG60 and EMP60 systems for my mould, Easy Lease for the release agent, and the EL2 laminating resin. So will see if this helps...Also I got EC breather layer. Any idea ? In the meantime, I am building myself an oven for out-of-autoclave prepreg, because I think (possibly wrongly !) that it would make my life easier and better finish right of the mould (using of course temperature resitant mould materials, resins etc...). Thanks ! This is a lot of details hard to tell or comment without see by picture. But main suggests Change your resin. Use resin suitable for infusion or hand lay up. Prefer good brand names Change your vacuum pump. Buy somehting you can control the pressure. Please consider. More pressure is meaning better surface. Sound like to me you have poor resin flow and poor pressure. Thanks a lot ! I have now the EL2 resin from Easycomposites. I also have a bit of infusion resin from sicomin that someone gave me to try. Very interesting about the pressure and pump. Do you have any vacuum values that you would consider to be good ? Do you think this pump would do ? https://www.easycomposites.co.uk/release-filmI could connect it to a vacuum regulator to have a good vacuum. Do you think that would be enough or even better pump would be necessary ? Thank you so much for all your help.
|
|
|
|
|
zeda3000
|
|
|
Group: Forum Members
Posts: 5,
Visits: 21
|
+x+x+xHi Zeda3000, Sorry for the late reply. I don't have a picture of the pinholes at the moment. So until now, here was my process: - Mould: I was using a black gelcoat that I bought in a composite shop for kayak builders here, backing it with glass woven and polyester resin. - Release agent: I was using either wax, or EasyLease from EC. Except recently, but that has been solved, I did not have any issue with releasing my parts. But then the issues start. Initially I was using for my carbon fiber parts a 200 gr/m2 carbon fiber cloth very similar to this: https://www.easycomposites.co.uk/honeycomb-bonding-epoxy-adhesiveMy epoxy was also epoxy sold by this kayak builder shop. It is relatively thick. I am mixing it quite well. The temperature of the room is fluctuating as I am doing this in my garage, but I tried to heat the working area as well as possible with some hot radiator. Then I apply my layers of carbon +epoxy (in a 1:1 or 1:1.2 carbon/resin ratio). Then I was using peel ply, perforated film and a breather layer (which is a bit thicker but less dense than the EC one). And then in a vacuum bag with uncontrolled vacuum (small pump with which I cannot control the vacuum. Basically, the film is really against the part and it is not easy to manually pull it away while the pump is running). I would leave the pump ON throughout the curing process. The result initially looked like I had resin starvation. Theses are lots of gaps between the carbon fibers. I was advised to limit resin flow by adding a second layer of perforated film, which helped. But nevertheless, at the end, I had still lots of small gaps...so the only method I found was to use a brush and put an extra layer of the same epoxy resin, sand (because I would still have hole and the brush does not give a nice flat surface in my hand), do it again, sand, do it again. etc...etc... this was the mots time consuming part of all. Then I was suggested to put a layer of transparent gelcoat in the mould which would be nice and uniform, let it mostly cure, and then do my carbon epoxy layup. But this never worked because that gelcoat would make massive fish eyes all over the place (whether with wax or easy lease). So I gave up on this, although I was hoping it would be the solution. Thing is that I have indeed been using chemicals (epoxy, mould gelcoat, transparent finish gelcoat, release agent etc...) for all kind of source and in particular that kayak builder shop. But it may not be the ideal stuffs for carbon parts like what I am trying to do. So now (but I have not tried yet), I have EG60 and EMP60 systems for my mould, Easy Lease for the release agent, and the EL2 laminating resin. So will see if this helps...Also I got EC breather layer. Any idea ? In the meantime, I am building myself an oven for out-of-autoclave prepreg, because I think (possibly wrongly !) that it would make my life easier and better finish right of the mould (using of course temperature resitant mould materials, resins etc...). Thanks ! This is a lot of details hard to tell or comment without see by picture. But main suggests Change your resin. Use resin suitable for infusion or hand lay up. Prefer good brand names Change your vacuum pump. Buy somehting you can control the pressure. Please consider. More pressure is meaning better surface. Sound like to me you have poor resin flow and poor pressure. Thanks a lot ! I have now the EL2 resin from Easycomposites. I also have a bit of infusion resin from sicomin that someone gave me to try. Very interesting about the pressure and pump. Do you have any vacuum values that you would consider to be good ? Do you think this pump would do ? https://www.easycomposites.co.uk/release-filmI could connect it to a vacuum regulator to have a good vacuum. Do you think that would be enough or even better pump would be necessary ? Thank you so much for all your help. First of all Vacuum pressure calculating according to your composite part size and lamination thickness. After your information i could tell you this pump will good for you or not.May i ask your part size or sample picture and what is your lamination thickness and layers. Is your process Hand lay up and vacuum press or direct infusion? I am sorry i have no clue about EL2 Resin. I am working most Professional Level Brand names. Thanks
|
|
|
|
|
Damien
|
|
|
Group: Forum Members
Posts: 32,
Visits: 132
|
+x+x+x+xHi Zeda3000, Sorry for the late reply. I don't have a picture of the pinholes at the moment. So until now, here was my process: - Mould: I was using a black gelcoat that I bought in a composite shop for kayak builders here, backing it with glass woven and polyester resin. - Release agent: I was using either wax, or EasyLease from EC. Except recently, but that has been solved, I did not have any issue with releasing my parts. But then the issues start. Initially I was using for my carbon fiber parts a 200 gr/m2 carbon fiber cloth very similar to this: https://www.easycomposites.co.uk/honeycomb-bonding-epoxy-adhesiveMy epoxy was also epoxy sold by this kayak builder shop. It is relatively thick. I am mixing it quite well. The temperature of the room is fluctuating as I am doing this in my garage, but I tried to heat the working area as well as possible with some hot radiator. Then I apply my layers of carbon +epoxy (in a 1:1 or 1:1.2 carbon/resin ratio). Then I was using peel ply, perforated film and a breather layer (which is a bit thicker but less dense than the EC one). And then in a vacuum bag with uncontrolled vacuum (small pump with which I cannot control the vacuum. Basically, the film is really against the part and it is not easy to manually pull it away while the pump is running). I would leave the pump ON throughout the curing process. The result initially looked like I had resin starvation. Theses are lots of gaps between the carbon fibers. I was advised to limit resin flow by adding a second layer of perforated film, which helped. But nevertheless, at the end, I had still lots of small gaps...so the only method I found was to use a brush and put an extra layer of the same epoxy resin, sand (because I would still have hole and the brush does not give a nice flat surface in my hand), do it again, sand, do it again. etc...etc... this was the mots time consuming part of all. Then I was suggested to put a layer of transparent gelcoat in the mould which would be nice and uniform, let it mostly cure, and then do my carbon epoxy layup. But this never worked because that gelcoat would make massive fish eyes all over the place (whether with wax or easy lease). So I gave up on this, although I was hoping it would be the solution. Thing is that I have indeed been using chemicals (epoxy, mould gelcoat, transparent finish gelcoat, release agent etc...) for all kind of source and in particular that kayak builder shop. But it may not be the ideal stuffs for carbon parts like what I am trying to do. So now (but I have not tried yet), I have EG60 and EMP60 systems for my mould, Easy Lease for the release agent, and the EL2 laminating resin. So will see if this helps...Also I got EC breather layer. Any idea ? In the meantime, I am building myself an oven for out-of-autoclave prepreg, because I think (possibly wrongly !) that it would make my life easier and better finish right of the mould (using of course temperature resitant mould materials, resins etc...). Thanks ! This is a lot of details hard to tell or comment without see by picture. But main suggests Change your resin. Use resin suitable for infusion or hand lay up. Prefer good brand names Change your vacuum pump. Buy somehting you can control the pressure. Please consider. More pressure is meaning better surface. Sound like to me you have poor resin flow and poor pressure. Thanks a lot ! I have now the EL2 resin from Easycomposites. I also have a bit of infusion resin from sicomin that someone gave me to try. Very interesting about the pressure and pump. Do you have any vacuum values that you would consider to be good ? Do you think this pump would do ? https://www.easycomposites.co.uk/release-filmI could connect it to a vacuum regulator to have a good vacuum. Do you think that would be enough or even better pump would be necessary ? Thank you so much for all your help. First of all Vacuum pressure calculating according to your composite part size and lamination thickness. After your information i could tell you this pump will good for you or not.May i ask your part size or sample picture and what is your lamination thickness and layers. Is your process Hand lay up and vacuum press or direct infusion? I am sorry i have no clue about EL2 Resin. I am working most Professional Level Brand names. Thanks Thanks ! I only do small parts for my motorcycle. So maybe 20 inches are the largest parts I make. I don't quite have a picture at hand, but I will try to make one. For instance right now I am doing protetors for my radiator, which are 10 inches long and 2 inches wide. Thickness is from 1 mm to 6 mm max (I have made some carbon plates of 6 mm. But most of the things I do are between 1 and 3 mm thick). My process is hand layup and vacuum press. I don't do infusion (it's a bit more tricky it seems). My layup is carbon (using 200, 450 and 650 gr/m2 depending on the thickness I want), peel ply, one or two layers of perforated film and a layer of breather. This pump, however, does not come with a vacuum regulator, but this is something I can get (though it's quite expensive). But I don't know whether it's absolutely necessary for what I do...or not. Thanks again!
|
|
|
|
|
zeda3000
|
|
|
Group: Forum Members
Posts: 5,
Visits: 21
|
+x+x+x+x+xHi Zeda3000, Sorry for the late reply. I don't have a picture of the pinholes at the moment. So until now, here was my process: - Mould: I was using a black gelcoat that I bought in a composite shop for kayak builders here, backing it with glass woven and polyester resin. - Release agent: I was using either wax, or EasyLease from EC. Except recently, but that has been solved, I did not have any issue with releasing my parts. But then the issues start. Initially I was using for my carbon fiber parts a 200 gr/m2 carbon fiber cloth very similar to this: https://www.easycomposites.co.uk/honeycomb-bonding-epoxy-adhesiveMy epoxy was also epoxy sold by this kayak builder shop. It is relatively thick. I am mixing it quite well. The temperature of the room is fluctuating as I am doing this in my garage, but I tried to heat the working area as well as possible with some hot radiator. Then I apply my layers of carbon +epoxy (in a 1:1 or 1:1.2 carbon/resin ratio). Then I was using peel ply, perforated film and a breather layer (which is a bit thicker but less dense than the EC one). And then in a vacuum bag with uncontrolled vacuum (small pump with which I cannot control the vacuum. Basically, the film is really against the part and it is not easy to manually pull it away while the pump is running). I would leave the pump ON throughout the curing process. The result initially looked like I had resin starvation. Theses are lots of gaps between the carbon fibers. I was advised to limit resin flow by adding a second layer of perforated film, which helped. But nevertheless, at the end, I had still lots of small gaps...so the only method I found was to use a brush and put an extra layer of the same epoxy resin, sand (because I would still have hole and the brush does not give a nice flat surface in my hand), do it again, sand, do it again. etc...etc... this was the mots time consuming part of all. Then I was suggested to put a layer of transparent gelcoat in the mould which would be nice and uniform, let it mostly cure, and then do my carbon epoxy layup. But this never worked because that gelcoat would make massive fish eyes all over the place (whether with wax or easy lease). So I gave up on this, although I was hoping it would be the solution. Thing is that I have indeed been using chemicals (epoxy, mould gelcoat, transparent finish gelcoat, release agent etc...) for all kind of source and in particular that kayak builder shop. But it may not be the ideal stuffs for carbon parts like what I am trying to do. So now (but I have not tried yet), I have EG60 and EMP60 systems for my mould, Easy Lease for the release agent, and the EL2 laminating resin. So will see if this helps...Also I got EC breather layer. Any idea ? In the meantime, I am building myself an oven for out-of-autoclave prepreg, because I think (possibly wrongly !) that it would make my life easier and better finish right of the mould (using of course temperature resitant mould materials, resins etc...). Thanks ! This is a lot of details hard to tell or comment without see by picture. But main suggests Change your resin. Use resin suitable for infusion or hand lay up. Prefer good brand names Change your vacuum pump. Buy somehting you can control the pressure. Please consider. More pressure is meaning better surface. Sound like to me you have poor resin flow and poor pressure. Thanks a lot ! I have now the EL2 resin from Easycomposites. I also have a bit of infusion resin from sicomin that someone gave me to try. Very interesting about the pressure and pump. Do you have any vacuum values that you would consider to be good ? Do you think this pump would do ? https://www.easycomposites.co.uk/release-filmI could connect it to a vacuum regulator to have a good vacuum. Do you think that would be enough or even better pump would be necessary ? Thank you so much for all your help. First of all Vacuum pressure calculating according to your composite part size and lamination thickness. After your information i could tell you this pump will good for you or not.May i ask your part size or sample picture and what is your lamination thickness and layers. Is your process Hand lay up and vacuum press or direct infusion? I am sorry i have no clue about EL2 Resin. I am working most Professional Level Brand names. Thanks Thanks ! I only do small parts for my motorcycle. So maybe 20 inches are the largest parts I make. I don't quite have a picture at hand, but I will try to make one. For instance right now I am doing protetors for my radiator, which are 10 inches long and 2 inches wide. Thickness is from 1 mm to 6 mm max (I have made some carbon plates of 6 mm. But most of the things I do are between 1 and 3 mm thick). My process is hand layup and vacuum press. I don't do infusion (it's a bit more tricky it seems). My layup is carbon (using 200, 450 and 650 gr/m2 depending on the thickness I want), peel ply, one or two layers of perforated film and a layer of breather. This pump, however, does not come with a vacuum regulator, but this is something I can get (though it's quite expensive). But I don't know whether it's absolutely necessary for what I do...or not. Thanks again! Your parts is small. Even you will not use Peel Ply or breathers you will not get Pinhole problems. I just check your Vaccum Pump link. To be honest , this is very expensive and low power. Try to search somehting arround 6-7 m3/h at least. You can buy from your local shop A/C Vaccum Gas Pump. It will be cheap and will do some job. Look like somehting like that.  Go to local pet shopt and buy this Air valve for on off. This is using mostly for Aquarium but , it will do same job. 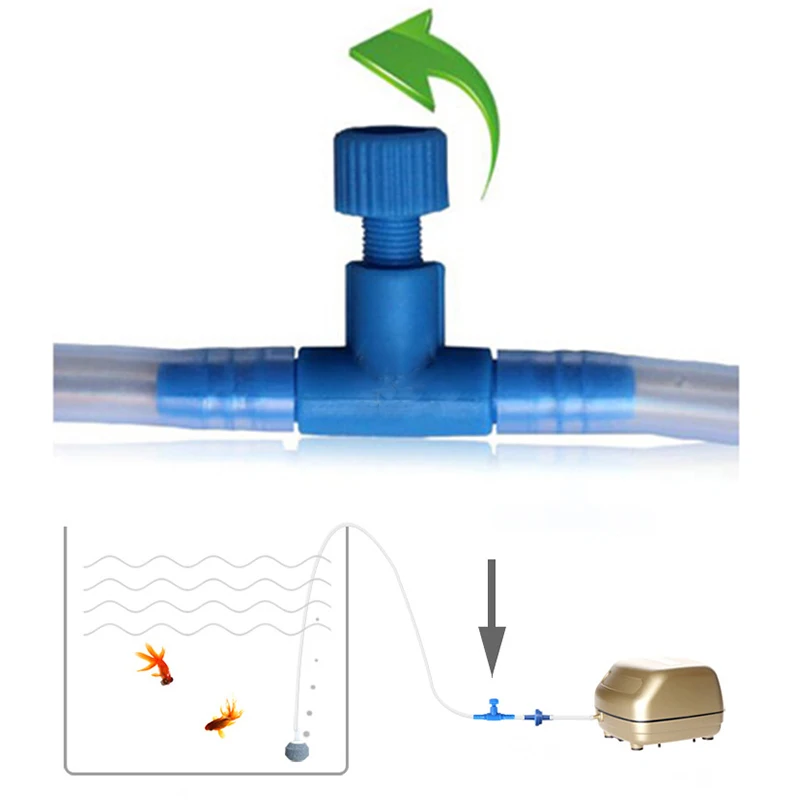 You can also buy from local shop Manometer to check your pressure. Easy to connect 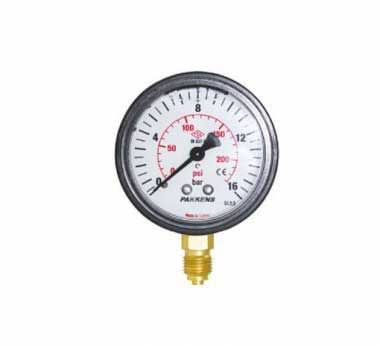 Buy one cheap Medical stethoscope it will help you to find your air leak. Just put in your vaccum bag and listen the noise. Now this is your process. From to top untill buttom be sure all your parts getting wet arround 1:2 ration (Fabric weight 1 / Resin Weight 2 in m2). You are not doing infusion. Dont use fast curring. Breather and Peel Ply will take the all over resin dont worry. Give full pressure arround 15 min. Close the valve and after close the vacuum pump. Record your current pressure. In first 2 hours ever 15 min check your pressure. If there is no air leak, your pressure will stay in same. If there is leak , open your pump and after open your valve. First two hours is critical. Untill your resin getting fully cure keep this pressure control. Before going to sleep give final shoot with pressure and wait for morning. I think your pressure is low resin doesnt getting pressure and this is why your getting pin hole. please check with your hand the Peak Tempature. It must be same in all area.
|
|
|
|
|
oekmont
|
|
|
Group: Forum Members
Posts: 550,
Visits: 27K
|
I would like to interrupt and tell my (and many others) opinion.
first of all the "size" of your pump is completely irrelevant as long as you are not making bigger boat hulls, or something similar in size. Pumps with bigger volume output are only faster to pull down bigger bags, but for car part sized moulds we are talking about a minute or two maximum. The final pressure will be the same.
Secondly and most important it is absolutely crucial not to apply full vacuum when vacuum bagging after wet layup. Full vacuum will degas the resin inside your part and will result in pinholes, the effect described.
Thirdly when dealing with pinholes gelcoat will make the problem worse. The air bubbles will be there all the same, but under under the gelcoat. So you will need to sand trough the gelcoat to fill them.
Last but not least, I would almost always prefer vacuum infusion over wet layup with vacuum bagging. In the end it is the same effort, but the result is better and much more consistent. Wet layup only makes sense to me if you haven't got a vacuum setup. If you bag the part, you could as well profit from infusion with all its benefits and don't mess around with resin.
|
|
|
|
|
Damien
|
|
|
Group: Forum Members
Posts: 32,
Visits: 132
|
+xI would like to interrupt and tell my (and many others) opinion. first of all the "size" of your pump is completely irrelevant as long as you are not making bigger boat hulls, or something similar in size. Pumps with bigger volume output are only faster to pull down bigger bags, but for car part sized moulds we are talking about a minute or two maximum. The final pressure will be the same. Secondly and most important it is absolutely crucial not to apply full vacuum when vacuum bagging after wet layup. Full vacuum will degas the resin inside your part and will result in pinholes, the effect described. Thirdly when dealing with pinholes gelcoat will make the problem worse. The air bubbles will be there all the same, but under under the gelcoat. So you will need to sand trough the gelcoat to fill them. Last but not least, I would almost always prefer vacuum infusion over wet layup with vacuum bagging. In the end it is the same effort, but the result is better and much more consistent. Wet layup only makes sense to me if you haven't got a vacuum setup. If you bag the part, you could as well profit from infusion with all its benefits and don't mess around with resin. Hi Oekmont, Thanks for your input. So if you don't apply full vacuum, how to you determine how much you should apply ? Do you have any standard reference for wet layup, if using a adjusting gauge ? OK for infusion...I have never tried. Thing is that I have 5 kg of standard epoxy right now...so I kind of want to finish it before buying infusion epoxy. My worry with infusion was that the parts I am making are sometime fairly complicated, with some angles, and applying the dry carbon on them, with different layer and then vacuum that for the infusion...I was wondering if then you would use some fixative spray ?
Now do you think infusion is easier than prepreg ? I am busy with a friend building an oven for prepreg that will be properly controlled, because I thought pre-preg would be easier and cleaner to operate. Or am I wrong ?
Thanks again!
|
|
|
|