|
Blastomussa
|
|
|
Group: Forum Members
Posts: 13,
Visits: 55
|
Hi there, I'm fairly new on here and this is my first time asking for advice, so go easy with me! I'm attempting to make a mould of a car part for a friend and have come to a point where I'm a little unsure of what to do, or if I can even take a mould from the part! I've constructed a flange for the part with fluted signboard, and plan on filleting all the overhanging edges and fill and smooth any securing holes also, but as I'm sitting looking at it, I'm starting to have second thoughts on whether I can even make a mould and have the part easily release! Any advice on what I should do next would be greatly appreciated.  I've tried to up load a few pics but it says I'm at or over the limit, even with just one picture. Anyone any ideas what I may be doing wrong with that, as I've only ever uploaded three pictures.
|
|
|
|
|
VVS
|
|
|
Group: Moderators
Posts: 226,
Visits: 334
|
Hi best thing to do is use a photo hosting site like photobucket, resize the pictures to 650 dpi and then copy past the URL on here.
|
|
|
|
|
Blastomussa
|
|
|
Group: Forum Members
Posts: 13,
Visits: 55
|
Thanks, I will try that, although it will be tomorrow now, as that beer that's staring at me needs attending to! Ha ha! Thanks again 😊
|
|
|
|
|
Hanaldo
|
|
|
Group: Forum Members
Posts: 2.5K,
Visits: 28K
|
Good to see you took care of that beer quick smart!  Shouldn't be a hard part to mould, your flanging looks like it will work. Just look out with those mounting holes, they look like they have a 0 draft angle and will be a weak spot on the mould, so might give you a bit of drama. Make sure what you do with the filleting wax has a nice positive draft angle as well, don't try to make it too vertical.
|
|
|
|
|
MarkMK
|
|
|
Group: Forum Members
Posts: 338,
Visits: 2K
|
As Hanaldo said, sections that are vertical and parallel to each other can always be tricky when it comes to releasing the finished part, not to mention getting your reinforcement down well to avoid bridging and air pockets Looks like you'll need a fair amount of filleting wax all the way around to fill the gaps. Another option might be to first create a vertical flange of a cm or two all the way around the part You'd then be able to add horizontal flanges to those that are flatter to the work surface and use less filleting wax to create a draught angle between them and the vertical sections of signboard you'd glued to the part. You could even just fix the part down to a large piece of acryllic sheet which would give you an even smoother flange area with no need to apply release agent to it.
|
|
|
|
|
Blastomussa
|
|
|
Group: Forum Members
Posts: 13,
Visits: 55
|
Thanks for the help guys, I think I will try both ways and see what turns out the best.
I will post pics of my progress, unless it's went embarrassingly wrong..... 😊
|
|
|
|
|
Blastomussa
|
|
|
Group: Forum Members
Posts: 13,
Visits: 55
|
I'm not sure if this is going to work, trying to get to grips with hosting pics from Photobucket. If it works, here is my efforts so far. I'm going to flatten the flanges down, and smooth out the recesses and thoroughly polish all surfaces. My next question is.......Im wanting to do resin infusion with this, but I was wanting this part to be resistant to some heat. I don't have the infusion resin as of yet, but I have the EC high temp resin. Owing to it's extended pot life (5-6hrs) would it be possible to use that, as it has a low viscosity, ok maybe not as low as the infusion resin, but would it work? 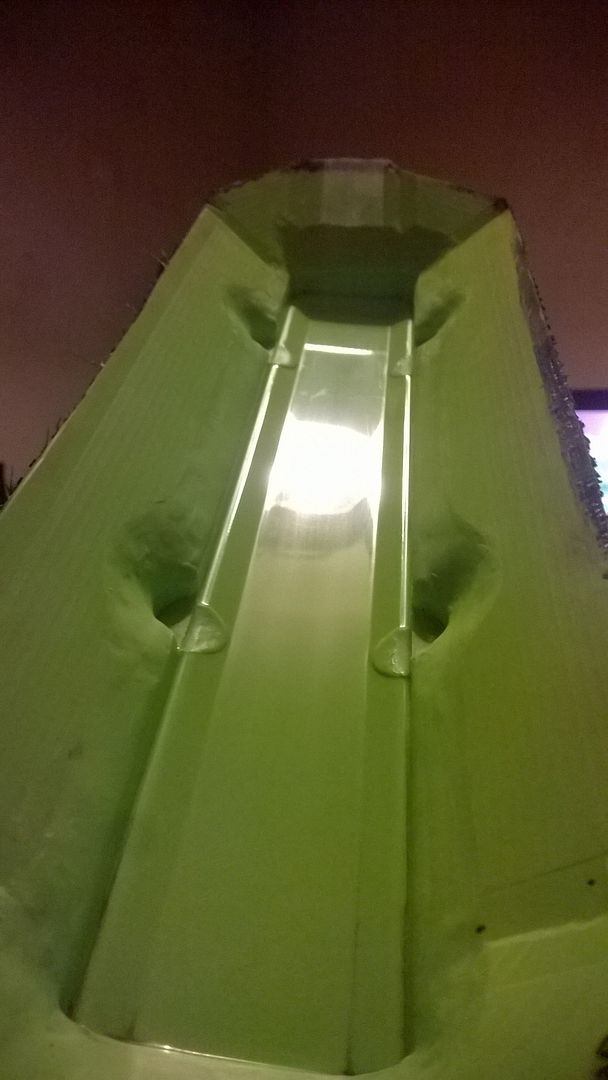
|
|
|
|
|
Hanaldo
|
|
|
Group: Forum Members
Posts: 2.5K,
Visits: 28K
|
I think you could. I regularly infuse with an epoxy that has a mixed viscosity of 400cps, so not too much lower than the EC high temperature epoxy. It's slower for sure, so I would recommend using spiral and infusing across the shortest distance to ensure a good wet out. Also heat the mould and the resin a bit before infusing, I think it will work nicely for a part that size. Just take care mixing the resin, the thicker resins tend to hold air bubble a bit more which can then cause pinholes in your part if you aren't degassing. Take your time mixing and it shouldn't be an issue.
|
|
|
|
|
Blastomussa
|
|
|
Group: Forum Members
Posts: 13,
Visits: 55
|
That's music to my ears! Thanks for the hints and tips, they are greatly appreciated. The other thing I was thinking of, is the length of time to the initial cure. I thought about putting the vacuum pump on a timer, as I'm not sure about running it for nearly 24hrs. I could have it come on for 15 mins every hour after the first, say 6-8 hrs, or would the pump be good for that length of time?
thanks again 😊
|
|
|
|
|
wojtepanik
|
|
|
Group: Forum Members
Posts: 102,
Visits: 582
|
It is a B series Honda engine spark plug cover. the shape is really hard to copie. I've done that with prepreg or sprayed gelcoat with normal layup I couldn't archive good results. I don't use infusion so can't tell how about it.
~~~Everytime I hear sound of demoulding part I have eargasm~~~
|
|
|
|