|
Chris
|
|
|
Group: Forum Members
Posts: 12,
Visits: 519
|
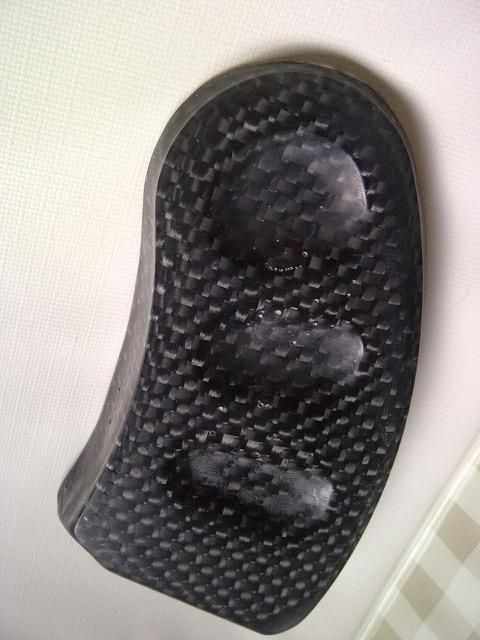
So, my goal is to make a full fairing eventually for mine and a few other bikes but I needed to start off small. After making an engine case cover wet laying carbon and kevlar I decided infusion was the way to go. I made a mould for a toe guard from a ali guard I have had on my bike for years. It took a bit of work and this was a practice mould as the final mould has the pattern repeated 3 times to make a few at once. Getting the vac bag to seal was a bit of an issue, I couldn't find the leak for love nor money so resorted to starting over with a fresh price of film etc. Perfect, I must have nicked it some how. The video tutorials were nice and easy to follow so it all went as expected, even if I had to put the whole lot in with the boiler as it was so cold the resin was still as it was mixed 7hours later. On taking it out of the mould there were a few air bubbles in the surface (how do I go about reducing this when mixing??) and the top 2 corners the cloth can't have been into the corners fully as the resin chipped off there was so much there. Also I was a bit too excited to de-mould so it wasn't fully cured, this could have caused the resin to chip on the corners.  Tuesday I plan on ordering some GC50 gelcoat so I can get the corners sorted. If I use a heat gun on this will it make the bubbles come to the surface and pop so I have a perfect finish?? I'll get another pic when the resin I've put on top to fill the voids has cured and been sanded, it is deeper than the pic makes it look. Any other advice is welcome........
|
|
|
|
|
carbonfibreworks
|
|
|
Group: Forum Members
Posts: 292,
Visits: 4.5K
|
Hi Chris A great first project, i make bespoke parts from carbon and will be making two fairings next week. i have created many scrap parts along the way so you do right by developing your skills on smaller parts. Regards Chris

|
|
|
|
|
fgayford
|
|
|
Group: Forum Members
Posts: 433,
Visits: 1.2K
|
Chris (31/03/2013)
So, my goal is to make a full fairing eventually for mine and a few other bikes but I needed to start off small. After making an engine case cover wet laying carbon and kevlar I decided infusion was the way to go. I made a mould for a toe guard from a ali guard I have had on my bike for years. It took a bit of work and this was a practice mould as the final mould has the pattern repeated 3 times to make a few at once. Getting the vac bag to seal was a bit of an issue, I couldn't find the leak for love nor money so resorted to starting over with a fresh price of film etc. Perfect, I must have nicked it some how. The video tutorials were nice and easy to follow so it all went as expected, even if I had to put the whole lot in with the boiler as it was so cold the resin was still as it was mixed 7hours later. On taking it out of the mould there were a few air bubbles in the surface (how do I go about reducing this when mixing??) and the top 2 corners the cloth can't have been into the corners fully as the resin chipped off there was so much there. Also I was a bit too excited to de-mould so it wasn't fully cured, this could have caused the resin to chip on the corners. Tuesday I plan on ordering some GC50 gelcoat so I can get the corners sorted. If I use a heat gun on this will it make the bubbles come to the surface and pop so I have a perfect finish?? I'll get another pic when the resin I've put on top to fill the voids has cured and been sanded, it is deeper than the pic makes it look. Any other advice is welcome........ The most important (once again my opinion) to pin hole free surfaces are viscosity. I heat my mold to about 95-100 f and my resin to 90 f before I infuse. I mix small batches and use slow hardener so I don't get caught with gelltime. You must have a perfectly sealed bag and close off the vacuum line once you have completed the infusion. I wait 30 seconds after I close off the vacuum line to close off the resin line. I wrote some where on this forum the causes of vacuum leaks, that once understood I have had no leaks ever. |
|
|
|
|
Chris
|
|
|
Group: Forum Members
Posts: 12,
Visits: 519
|
Bartonphoenix750 (31/03/2013)
Hi Chris
A great first project, i make bespoke parts from carbon and will be making two fairings next week. i have created many scrap parts along the way so you do right by developing your skills on smaller parts.
Regards ChrisWhat bikes are the fairings for?? Thanks for the encouragement, I'm happy with how things are going considering i've only made 3 parts so far. This is it after a bit of a sand and polish, the problem is the more I sand the more little air bubbles I open 
But, to bolt onto my bike it will do.
|
|
|
|
|
Chris
|
|
|
Group: Forum Members
Posts: 12,
Visits: 519
|
fgayford (01/04/2013)
The most important (once again my opinion) to pin hole free surfaces are viscosity. I heat my mold to about 95-100 f and my resin to 90 f before I infuse. I mix small batches and use slow hardener so I don't get caught with gelltime. You must have a perfectly sealed bag and close off the vacuum line once you have completed the infusion. I wait 30 seconds after I close off the vacuum line to close off the resin line. I wrote some where on this forum the causes of vacuum leaks, that once understood I have had no leaks ever. Hope this helps. Fred See I didn't have any issues with time as the part is so small, unfortunately so is my patience!! Might need to work on that I fear. How do you heat the mould (ive seen some other videos online that people have put heating elements into the moulds when making them),is it done once you have put the carbon etc in there and drawn vacuum? Again in another video it said the best way was to clamp the resin line and leave the vacuum line pulling any air out of the part, kind of the reverse of your suggestion. Whats your thoughts on that? Yes it does help, thank you!
|
|
|
|
|
carbonfibreworks
|
|
|
Group: Forum Members
Posts: 292,
Visits: 4.5K
|
Hi Chris The fairings are for a 50cc grand prix bike called a UFO and the other is for a classic racer called a Greeves (250cc) i have just made a clutch pressure plate for a race bike and that has come out at 12 grams , you can see some of my bikes at www.bartonphoenix.moonfruit.com the image below is the clutch plate,i have some minor finishing work to do but other than that it came out ok. Regards Chris 
|
|
|
|
|
alebassa
|
|
|
Group: Forum Members
Posts: 48,
Visits: 171
|
Again in another video it said the best way was to clamp the resin line and leave the vacuum line pulling any air out of the part, kind of the reverse of your suggestion. Whats your thoughts on that?
If you clamp the resin line first, you will have better fiber/resin ratio (lighter parts) but you can have pinholes more easily. If you clamp vacuum first you'll get heavier parts but more easily it will be pin holes free. This is what I learnt from this priceless forum.... |
|
|
|
|
Chris
|
|
|
Group: Forum Members
Posts: 12,
Visits: 519
|
Bartonphoenix750 (01/04/2013)
Hi Chris The fairings are for a 50cc grand prix bike called a UFO and the other is for a classic racer called a Greeves (250cc) i have just made a clutch pressure plate for a race bike and that has come out at 12 grams , you can see some of my bikes at www.bartonphoenix.moonfruit.com the image below is the clutch plate,i have some minor finishing work to do but other than that it came out ok. Regards Chris They look great, a lot of hours must go into them! You've got me looking at what I can recreate in carbon on my bikes now...........
|
|
|
|
|
Chris
|
|
|
Group: Forum Members
Posts: 12,
Visits: 519
|
[b]alebassa (04/04/2013) If you clamp the resin line first, you will have better fiber/resin ratio (lighter parts) but you can have pinholes more easily. If you clamp vacuum first you'll get heavier parts but more easily it will be pin holes free. This is what I learnt from this priceless forum.... Good to know. I've got some of the gel coat to try tomorrow, then I think I will give your suggestion a go next week to compare.
|
|
|
|
|
fgayford
|
|
|
Group: Forum Members
Posts: 433,
Visits: 1.2K
|
Hi Chris
You can build a small hot box using styrofoam board and use a small space heater. You can easily set the temperature to what you need.
It really isn't air bubbles but the resin boiling volitles you see near the vaccum line. So by closing vacuum first this will stop. I then allow resin to still flow into the bag and it will. I wait for 30 seconds to allow the resin to kind of balance in the laminate then close the resin line. Yes you get a slightly heavier part but eliminate the nightmare work of filling pinholes. By the time your done filling and clearcoating sanding clearcoating your probably are just as heavy .
Others may disagree but this works for me.
Hope this helps
Fred
|
|
|
|